
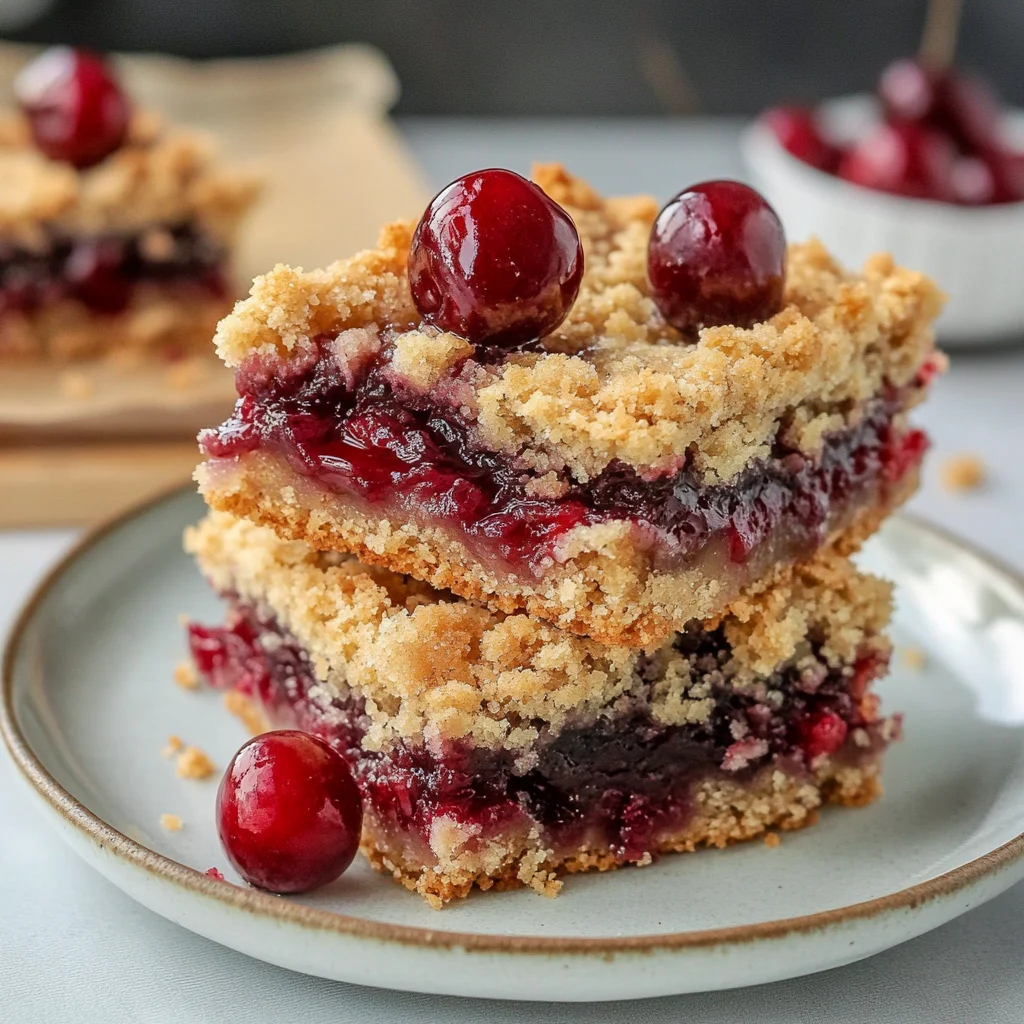
Imagine sinking your teeth into a warm Cherry Crumble Bar, where the buttery crust crumbles delightfully in your mouth, and the sweet, tart cherry filling bursts with flavor. The aroma wafting from the oven as it bakes is enough to make anyone swoon, filling the kitchen with a cozy embrace that hints at sweet memories and lazy afternoons spent indulging in dessert.
These Cherry Crumble Bars are not just a treat; they’re the perfect companion for summer picnics or cozy evenings on the couch with loved ones. I still remember the first time I shared these bars at a family gathering—everyone eagerly reaching for seconds, laughter echoing as we savored each bite. With every crumb, there’s an excitement that promises to transport you back to those joyful moments, making these bars an irresistible addition to any occasion.
Why Is Cherry Crumble Bars So Irresistibly Good?
Bursting with flavor, these Cherry Crumble Bars feature a buttery crust that melts in your mouth. Easy to prepare, you’ll whip them up in just 15 minutes of prep! Versatile enough for dessert or a snack, they’re perfect for any occasion. Fresh or frozen cherries make this recipe adaptable year-round. Plus, the delightful blend of oats and cinnamon adds a comforting touch that everyone loves!
Cherry Crumble Bars Ingredients
For the Crust and Topping
- 1 cup all-purpose flour – This forms the base of your crumble, giving it structure and texture.
- 1/2 cup brown sugar (packed) – Adds a rich sweetness and deeper flavor to your crumble.
- 1/2 cup unsalted butter (melted) – Ensures a buttery taste and helps bind the ingredients together.
- 1/2 cup rolled oats – Provides a hearty texture and a delightful chewiness to the topping.
- 1/4 teaspoon salt – Enhances the flavors of the other ingredients, balancing sweetness.
- 1/4 teaspoon cinnamon – Introduces a warm, aromatic spice that complements the cherry filling.
For the Cherry Filling
- 2 cups fresh or frozen cherries (pitted and halved) – The star of the show, offering tartness and sweetness in every bite.
- 1/4 cup granulated sugar – Sweetens the cherries perfectly, making them irresistible in these Cherry Crumble Bars.
- 1 tablespoon cornstarch – Acts as a thickener, ensuring your cherry filling is not too runny.
- 1 tablespoon lemon juice – Brightens up the flavor of the cherries, balancing their natural sweetness.
How to Make Cherry Crumble Bars
1. Preheat the oven to 350°F (175°C). Grease the baking pan with a little butter or non-stick spray to ensure your bars come out easily after baking.
2. Combine in a mixing bowl the 1 cup all-purpose flour, 1/2 cup brown sugar (packed), 1/2 cup melted unsalted butter, 1/2 cup rolled oats, 1/4 teaspoon salt, and 1/4 teaspoon cinnamon. Mix until crumbly—this should take about a minute.
3. Press half of the mixture into the bottom of the prepared baking pan to form a solid crust. Aim for an even layer that covers the entire base, which will provide a delicious foundation for your cherry filling.
For the Filling:
4. Mix together in another bowl the 2 cups fresh or frozen cherries (pitted and halved), 1/4 cup granulated sugar, 1 tablespoon cornstarch, and 1 tablespoon lemon juice until well combined. This will create a sweet and tangy filling that’s bursting with flavor!
5. Spread the cherry mixture evenly over the crust in the baking pan. Make sure to cover every inch so each bite is filled with that luscious cherry goodness.
6. Sprinkle the remaining crumble mixture over the cherry filling. This top layer will bake into a golden brown topping that adds perfect texture to your Cherry Crumble Bars.
7. Bake in the preheated oven for 30 minutes or until the topping is golden brown. Keep an eye on it; you want it beautifully browned, and your kitchen will smell heavenly!
8. Allow to cool before cutting into bars and serving. This helps set everything together nicely so you can enjoy perfect slices!
Optional: Serve warm with a scoop of vanilla ice cream for an extra treat!
Exact quantities are listed in the recipe card below.
Tips for the Best Cherry Crumble Bars
- Crust Consistency: Ensure the crust mixture is crumbly but holds together when pressed. Don’t overmix; it should resemble wet sand.
- Butter Temperature: Use melted butter, but let it cool slightly before mixing. Hot butter can melt the sugar and affect texture.
- Cherry Prep: If using fresh cherries, make sure they are pitted and halved evenly for consistent cooking. Frozen cherries should be thawed and drained to avoid excess moisture.
- Sugar Balance: Adjust granulated sugar in the filling according to your cherry’s tartness. Taste them first; sweeter cherries need less sugar.
- Cool Before Slicing: Allow the bars to cool completely in the pan before cutting into squares. This helps prevent a messy slice and keeps your Cherry Crumble Bars intact.
How to Store and Freeze Cherry Crumble Bars

- Room Temperature: Enjoy your Cherry Crumble Bars fresh for up to 2 days in an airtight container to maintain their delightful texture.
- Fridge: For longer enjoyment, store in the refrigerator for up to 5 days. Keep them covered to prevent drying out.
- Freezer: Freeze individual bars in plastic wrap, then place them in a zip-top bag for up to 3 months. Thaw overnight in the fridge before enjoying.
- Reheating: Warm bars in the microwave for about 15-20 seconds or in the oven at 350°F (175°C) for 10 minutes for that fresh-baked taste.
Cherry Crumble Bars Your Way
Feel free to get creative with this recipe and tailor it to your family’s tastes!
- Gluten-Free: Substitute all-purpose flour with a gluten-free flour blend for a delicious alternative. This allows everyone to enjoy the sweetness without worry.
- Nutty Twist: Swap half of the rolled oats with finely chopped nuts, such as walnuts or almonds, to add a delightful crunch. The nutty flavor pairs beautifully with the sweet cherries.
- Spiced Up: Enhance the flavor by adding a pinch of nutmeg or ginger to the cinnamon in the topping. These spices bring warmth and depth, creating an inviting aroma while baking.
- Maple Sweetness: Replace brown sugar with maple syrup for a unique taste in both the crust and filling. The maple adds a rich, earthy sweetness that complements the cherries perfectly.
- Berry Medley: Mix in other berries like blueberries or raspberries along with the cherries for an exciting twist. Combining fruits not only boosts flavor but also adds vibrant colors to your bars.
- Citrus Zing: Add zest from an orange or lemon into the cherry filling for a refreshing citrus kick. This brightens up each bite and enhances the overall flavor profile.
- Vegan Option: Use coconut oil instead of butter and substitute flaxseed meal mixed with water for an egg alternative if needed. You’ll still achieve that buttery texture while keeping it plant-based!
Make Ahead Options
These Cherry Crumble Bars are a fantastic choice for meal prep, allowing you to savor their delightful flavors even on the busiest days. You can prepare the crust and topping ingredients—1 cup of all-purpose flour, 1/2 cup of packed brown sugar, 1/2 cup of melted unsalted butter, 1/2 cup of rolled oats, along with 1/4 teaspoon each of salt and cinnamon—up to 3 days in advance. Simply mix these ingredients until crumbly and press half into your greased baking pan when you’re ready to bake. For the cherry filling, combine 2 cups of pitted and halved cherries with 1/4 cup granulated sugar, 1 tablespoon cornstarch, and 1 tablespoon lemon juice; this can also be made ahead and stored in the fridge for up to 24 hours. When it’s time to enjoy your Cherry Crumble Bars, simply layer the filling over the crust, sprinkle the remaining crumble on top, bake for 30 minutes at 350°F (175°C), and allow them to cool before slicing into bars. This way, you’ll have a delicious treat ready to go with minimal effort!
Cherry Crumble Bars Recipe FAQs
What type of cherries should I use for the filling?
You can use either fresh or frozen cherries for this recipe. If using fresh, make sure they are ripe and pitted for the best flavor. Frozen cherries are a great option too—just thaw them before mixing with the sugar and cornstarch.
Can I substitute any ingredients in the crust?
Absolutely! If you need a gluten-free option, you can replace all-purpose flour with almond flour or a gluten-free all-purpose blend. For a dairy-free version, consider using coconut oil instead of unsalted butter; just melt it before mixing to keep the texture right.
How should I store leftover cherry crumble bars?
Once they’re completely cool, store your cherry crumble bars in an airtight container at room temperature for up to 3 days. If you want them to last longer, refrigerate them where they can be kept for about a week without losing their delightful taste!
Can I freeze these cherry crumble bars?
Yes, indeed! After baking and cooling completely, wrap the bars tightly in plastic wrap and then place them in a freezer-safe container. They can be frozen for up to 3 months. When you’re ready to enjoy them again, simply thaw in the fridge overnight or at room temperature for a few hours.
What’s the best way to cut these bars?
To achieve clean cuts, let the bars cool completely before slicing—about 30 minutes should do it! You might find it helpful to use a sharp knife dipped in hot water; this will help slice through the crumbly topping without disturbing it too much.
How many servings does this recipe yield?
This delightful cherry crumble bar recipe yields about 4 generous servings, making it perfect for sharing with loved ones or enjoying throughout your week. Each serving is approximately 250 calories, so you can indulge without too much guilt!