
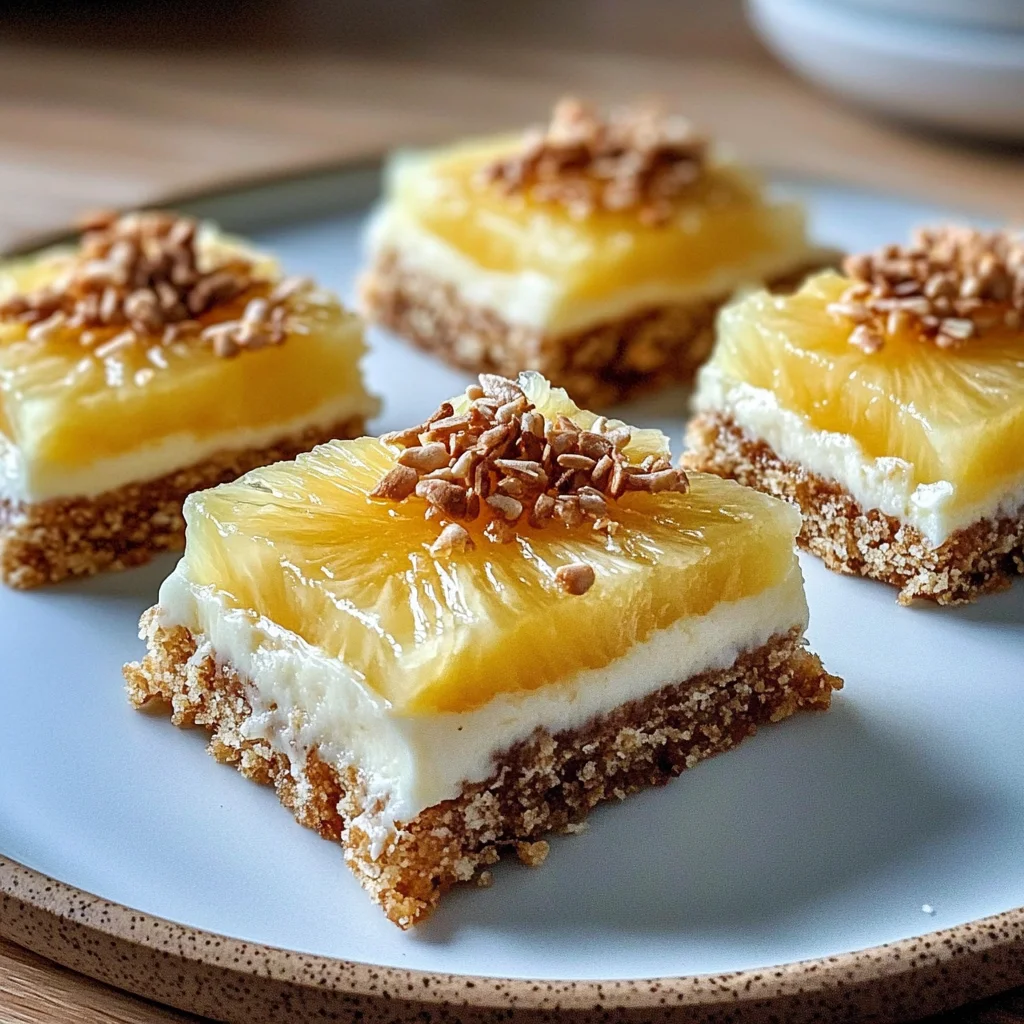
Imagine biting into a slice of Pineapple Dream Dessert Bars, where the sweet, tangy burst of pineapple dances on your tongue, complemented by a buttery, crumbly crust that melts in your mouth. The creamy filling is like a tropical vacation for your taste buds, inviting you to savor each delightful layer while the aroma wafts through the air, promising a delicious escape from the everyday routine.
These bars are not just a treat; they’re a nostalgic reminder of summer picnics and family gatherings filled with laughter and sunshine. Picture yourself serving these vibrant creations at your next BBQ or potluck, leaving everyone craving more and sharing stories about their favorite summer memories. With each bite, you’ll experience an explosion of flavors that will have everyone asking for the recipe—trust me, you’ll want to keep it as your little secret!
Why Is Pineapple Dream Dessert Bars So Irresistibly Good?
Delightfully refreshing, these dessert bars bring a taste of summer straight to your table with their creamy pineapple filling. Quick and easy to make, you’ll have them ready in just 50 minutes—perfect for last-minute gatherings! Buttery crust adds a delightful crunch that perfectly complements the smooth filling. Crowd-pleaser alert! Everyone will be asking for seconds, making them ideal for potlucks and parties. Versatile and fun, you can easily customize them with additional fruit or toppings for a unique twist!
Ingredients for Pineapple Dream Dessert Bars
For the Crust
- 1 cup all-purpose flour – This forms the base of your dessert, providing structure and a lovely texture.
- 1/2 cup unsalted butter (softened) – Softened butter ensures a rich, buttery flavor and helps create that melt-in-your-mouth crust.
- 1/4 cup granulated sugar – Adds a touch of sweetness to balance the buttery flavor of the crust.
- 1/4 teaspoon salt – A small amount enhances the sweetness and rounds out the flavors beautifully.
For the Filling
- 1 can crushed pineapple (drained) – Fresh pineapple flavor shines through in this creamy filling, bringing a tropical twist.
- 1 cup cream cheese (softened) – Softened cream cheese creates a smooth, luscious filling that pairs perfectly with pineapple.
- 1/2 cup powdered sugar – This sweetens the filling while keeping it light and airy for your Pineapple Dream Dessert Bars.
- 1 teaspoon vanilla extract – Adds depth and warmth to the filling, making every bite irresistible.
- 1 cup whipped topping – Lightens the filling for a fluffy texture that complements the rich cream cheese perfectly.
How to Make Pineapple Dream Dessert Bars
1. Preheat the oven to 350°F (175°C). In a mixing bowl, combine 1 cup all-purpose flour, 1/2 cup softened unsalted butter, 1/4 cup granulated sugar, and 1/4 teaspoon salt. Mix until crumbly—this will form a lovely base for your bars.
2. Press the mixture into the bottom of a greased 9×9 inch baking pan. Bake for about 15 minutes or until lightly golden. You’ll want that perfect golden hue to create a delicious crust.
For the Filling:
3. Beat together 1 cup softened cream cheese and 1/2 cup powdered sugar in another bowl until smooth. Add in 1 teaspoon vanilla extract and mix well; this will create a creamy, flavorful base for your filling.
4. Fold in the drained contents of 1 can crushed pineapple and 1 cup whipped topping until well combined. The combination of these ingredients will give your dessert bars that delightful tropical flair!
5. Spread the pineapple filling evenly over the baked crust, smoothing it out with a spatula for an even layer. Then, refrigerate for at least 30 minutes to set—this step is key for achieving that perfect texture.
6. Cut into bars and serve chilled! The refreshing taste of Pineapple Dream Dessert Bars is sure to impress your family and friends during those warm summer gatherings.
Optional: Drizzle with extra whipped topping before serving for added flair!
Exact quantities are listed in the recipe card below.
Expert Tips
- Butter Consistency: Use softened butter for the crust; if it’s too cold, your bars won’t hold together well.
- Flour Measurement: Spoon and level the flour when measuring to avoid a dense crust; too much flour can lead to dryness.
- Chill Time: Allow the filling to chill for at least 30 minutes; this helps the Pineapple Dream Dessert Bars set properly and enhances flavors.
- Pineapple Drainage: Ensure you drain the crushed pineapple thoroughly; excess liquid can make your filling runny.
- Even Cutting: Use a sharp knife to cut the bars after chilling for clean edges and easier serving; warm knives work best for neat slices.
How to Store and Freeze Pineapple Dream Dessert Bars

- Fridge: Store your Pineapple Dream Dessert Bars in an airtight container for up to 5 days. This helps maintain their creamy texture and freshness.
- Freezer: For longer storage, freeze the bars in individual portions wrapped tightly in plastic wrap, then place them in a freezer-safe bag for up to 3 months.
- Thawing: When ready to enjoy, thaw the bars in the fridge overnight. This preserves their delightful creaminess without compromising flavor.
- Serving Suggestions: Serve chilled for the best taste experience, enhancing those refreshing summer vibes with every bite!
Pineapple Dream Dessert Bars Your Way
Feel free to unleash your creativity and make this dessert truly your own with delightful twists!
- Gluten-Free: Substitute the all-purpose flour with a gluten-free flour blend for a deliciously inclusive treat. This swap maintains the crust’s buttery flavor while ensuring everyone can enjoy it. A simple adjustment can make all the difference at family gatherings.
- Coconut Twist: Use coconut flour in place of regular flour for a tropical flair. This adds a subtle coconut taste that complements the pineapple beautifully, creating an exotic dessert experience. Your guests will be raving about this unique twist!
- Honey Sweetness: Swap granulated sugar for honey to add natural sweetness and a hint of floral notes. It’s a wonderful way to enhance the flavor profile while keeping things wholesome. Just remember, honey is sweeter, so you might want to reduce the amount slightly!
- Nutty Crunch: Incorporate finely chopped nuts into the crust for added texture and flavor. Almonds or pecans work wonderfully here, giving that delightful crunch along with a nutty aroma. It’s an excellent way to elevate your dessert experience!
- Cinnamon Spice: Sprinkle some ground cinnamon into the crust mixture for a warm, inviting flavor. This great addition pairs perfectly with pineapple and adds a cozy touch. Your kitchen will smell like heaven as you bake!
- Lemon Zing: Add lemon zest to the crust for an invigorating citrus kick. The bright flavor balances well with the creamy filling and enhances the overall freshness of these bars. Every bite will feel like sunshine on your palate!
- Chocolate Drizzle: Top your finished bars with melted chocolate for a decadent touch. Dark or white chocolate both provide an incredible contrast to the fruity filling, making each bite indulgent and irresistible. It’s a sweet surprise that will impress everyone!
Make Ahead Options
If you’re looking for a delightful dessert that can be prepped in advance, these Pineapple Dream Dessert Bars are your answer. The buttery crust made from 1 cup of all-purpose flour, 1/2 cup of softened unsalted butter, 1/4 cup of granulated sugar, and a pinch of salt can be prepared up to 24 hours ahead. Simply bake it as directed and store it covered at room temperature. The creamy filling, featuring 1 can of drained crushed pineapple, 1 cup of softened cream cheese, 1/2 cup of powdered sugar, and 1 cup of whipped topping, can also be made a day in advance. Just mix the ingredients until smooth and fold them together; then refrigerate the filling separately. When you’re ready to serve, spread the filling over the crust and chill for an additional 30 minutes to set. This time-saving approach ensures that your Pineapple Dream Dessert Bars maintain their fresh taste and perfect texture for summer gatherings!
Pineapple Dream Dessert Bars Recipe FAQs
What type of flour is best for the crust?
All-purpose flour is perfect for this recipe as it provides the right balance of structure and tenderness. If you want a gluten-free option, you can substitute with a 1: 1 gluten-free flour blend, which works beautifully in this dessert.
Can I use fresh pineapple instead of canned?
Absolutely! Fresh pineapple can add a delightful flavor and texture to your bars. Just be sure to finely chop it and drain any excess juice to avoid making the filling too watery.
How should I store leftover Pineapple Dream Dessert Bars?
To keep your bars fresh, store them in an airtight container in the refrigerator. They will stay delicious for up to 3 days, but I recommend enjoying them within 2 days for the best taste and texture.
Can I freeze these dessert bars?
Yes! You can freeze Pineapple Dream Dessert Bars for up to 2 months. Wrap them tightly in plastic wrap and then in aluminum foil before placing them in an airtight container. When you’re ready to enjoy, simply thaw them overnight in the fridge.
What if my crust doesn’t turn out golden brown?
If your crust isn’t golden brown after 15 minutes, it may need a few more minutes in the oven. Keep an eye on it; you want it just lightly golden, which adds a lovely flavor and ensures it’s cooked through without being overdone.
Is this recipe suitable for special diets?
While this recipe contains dairy and gluten, you can modify it for dietary preferences! Use dairy alternatives like vegan cream cheese and whipped topping, along with a gluten-free flour blend for the crust, making it accessible for those with specific dietary needs.
Pineapple Dream Dessert Bars
Ingredients
Method
- Preheat the oven to 350°F (175°C). In a mixing bowl, combine flour, softened butter, sugar, and salt. Mix until crumbly.
- Press the mixture into the bottom of a greased 9x9 inch baking pan. Bake for 15 minutes or until lightly golden.
- In another bowl, beat the softened cream cheese and powdered sugar until smooth. Add vanilla extract and mix well.
- Fold in the drained crushed pineapple and whipped topping until well combined.
- Spread the pineapple filling evenly over the baked crust. Refrigerate for at least 30 minutes to set.
- Cut into bars and serve chilled.